
4 Steps to Achieve BUILT TO SAVE® Certification
A Builders’ Guide to Building Superior Energy-Efficient Homes
BUILT TO SAVE® is a regional energy efficiency program that awards high performance certifications to new homes built to standards that surpass minimum building code requirements. The homes are inspected during construction and tested after completion by a licensed, independent third-party home energy Rater hired by the builder. Builders participating in this voluntary program represent an elite group of professionals who take pride in their work and value the superior benefits the BUILT TO SAVE® program provides to their homebuyers. Here is a step-by-step guide on how a BUILT TO SAVE® certification is earned.
NOTE: Builders must apply for membership into the BUILT TO SAVE® program in order to request certification for their homes.
Step 1. PRE-CONSTRUCTION
Projected Energy Efficiency Analysis
As the first step in the BUILT TO SAVE® process, a licensed home energy Rater reviews the home’s plans, including elevation and floorplan blueprints, Manual J, energy-saving items like ENERGY STAR® appliances, and heating and cooling information. The Rater enters the data from these documents into specialized software that produces a projected Home Energy Rating System (HERS) score. The HERS score is recognized nationally as a good predictor of a home’s energy usage once it’s built.
NOTE: Doing a projected analysis before the home is built helps the builder make any necessary adjustments to achieve the targeted energy score easier and at a lower cost, compared to doing them once construction is underway.
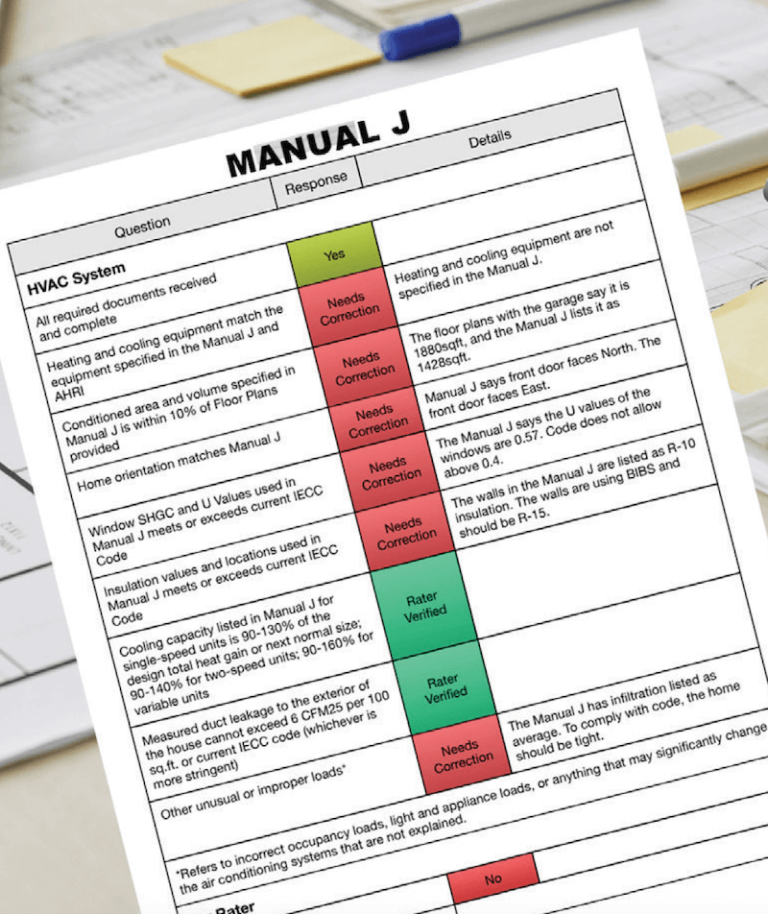
Review of the Manual J Calculation
Heating, Ventilation, and Air Conditioning (HVAC) contractors prepare a Manual J by entering the home’s blueprint information into a specialized program. This program calculates the heating and cooling loads of a home and recommends the proper size air conditioning unit based on the home’s specifications. The software is adapted to the particular climate the home is located in. Manual J also accounts for other factors, such as the amount of heat and humidity that each occupant of the home will add to the interior.
NOTE: Doing a projected analysis before the home is built helps the builder make any necessary adjustments to achieve the targeted energy score easier and at a lower cost, compared to doing them once construction is underway. NOTE: A properly sized heating and cooling system is critical to energy savings and—more importantly—to the home’s comfort. An oversized system will waste more energy, have more maintenance issues, reduce comfort by cycling on and off before it has a chance to remove humidity from the home, and cause moisture and mold issues over time.
Step 2. THERMAL INSPECTION
Thermal Inspection (After Insulation but Before Drywall)
A home energy Rater performs a thermal inspection after the insulation is installed and before the walls are put in place. The Rater visually inspects all areas of the home to check that the insulation is installed correctly and has the proper R-values. Insulation that has been compressed by force between the studs or into crevices loses its R-value and will not insulate the home adequately. Even spray foam insulation can be poorly installed. Bubbles formed during application can create voids inside the foam that reduce its efficiency. The Rater gives special attention to areas that could allow cold air to escape into the attic or to the outside.
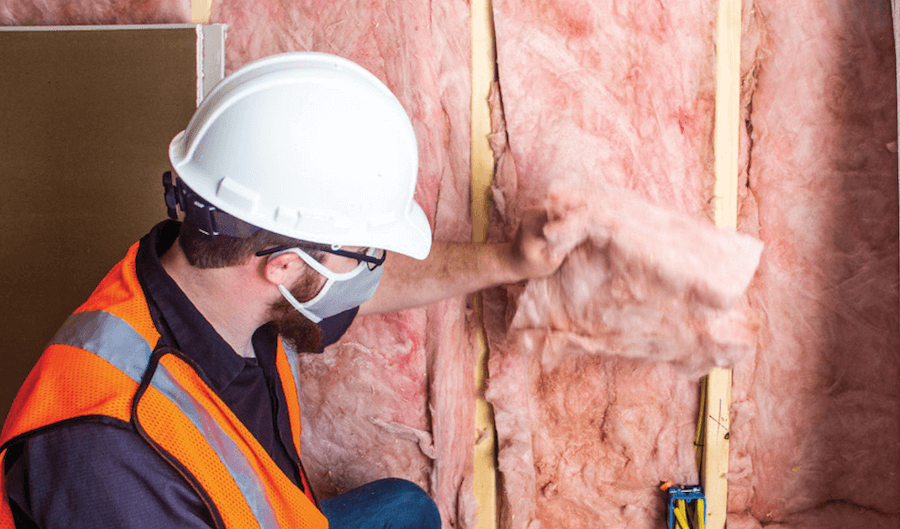
NOTE: According to the Department of Energy, a typical home has about a half-mile of cracks and gaps throughout. This can increase annual heating and cooling costs by 20-40% due to air leakage. A thermal inspection performed by a third-party Rater can help assure the homebuyer that the home was sealed properly and give them peace of mind.
Moisture Control
The Rater inspects the home’s envelope—including the outer walls, ceiling, and windows— and looks for areas that could create moisture problems in the future. Since the window manufacturer’s labels are still in place at this point as required by law, the Rater makes notes to ensure that their values are as required by code and that they relate to what was specified in Manual J. The Rater also checks areas behind bathtubs located near an exterior wall to ensure that a waterproof backing will be used to avoid moisture issues caused by condensation from changes in temperature.
NOTE: Although moisture management is not a factor in energy efficiency, protecting the home against moisture problems is included in BUILT TO SAVE® inspections as part of the program’s whole-house approach to providing a healthy home environment.

Ventilation
Tight construction is required for superior energy efficiency. But as the home becomes tighter, it is critical that a proper fresh air system is installed to allow the home to breathe. The Rater’s visual inspection ensures ventilation systems are placed properly. Having properly installed ventilation is especially important if the home has spray foam insulation, which has extremely high sealing characteristics. A variety of humidity-controlling devices are available on the market today that can greatly enhance the comfort level of a home.
NOTE: Proper mechanical ventilation is key to ensuring the quality of indoor air. Ventilation is nothing more than replacing stale air with fresh air. It is crucial for tightly constructed homes that can trap dust, pollen, and unhealthy air resulting from day-to-day activities, such as cooking, bathing, and even the occupants’ breathing.
Ducts & Air Registers
The Rater inspects the HVAC duct system, looking for areas that are poorly sealed and connected. Mastic is an inexpensive sealant that should be used generously over duct taping at all the seams for maximum protection. Simply using foil tape is not acceptable since heat will cause the tape to fall off and allow air to escape into the attic. The Rater also inspects the locations where the ducts connect to vents and registers in the ceiling to ensure proper connections.
NOTE: A properly designed duct system, a function of the HVAC contractor, is key to making sure ventilation delivers an equal amount of air at equal pressure to every room of the home. Failure to equalize airflow will lead to some rooms being colder or hotter than others. Installing jumper ducts is a good way to equalize air pressures and can be a remedy for rooms that are noticeably warmer or colder than other parts of the house.

Step 3. FINAL INSPECTION
Verification of Final Results
The Rater performs a final review of the home’s specifications to verify that it was built as indicated during the pre-construction stage. They make notes of items that can add or detract from the home’s projected energy score. Additionally, the final inspection includes a blower door test and a duct leakage test to calculate the home’s HERS score.
The Duct Leakage Test
The duck leakage test identifies leaks in the joints and seams of the HVAC system’s ductwork using diagnostic hardware to measure the ducts’ airtightness. The procedure uses a calibrated fan that measures the airflow rate and a pressure sensing device that records the pressure created by the fan. The amount of leakage must not surpass the acceptable range to meet the requirements of the BUILT TO SAVE® program.
NOTE: An acceptable duct leakage test in Climate Zone 1 (Cameron County) and Climate Zone 2 (Hidalgo County) requires air leakage rates of less than 4% of the conditioned floor area (living space). Anything more means too much air escapes from the ducts and will cost the homeowner money in utilities.
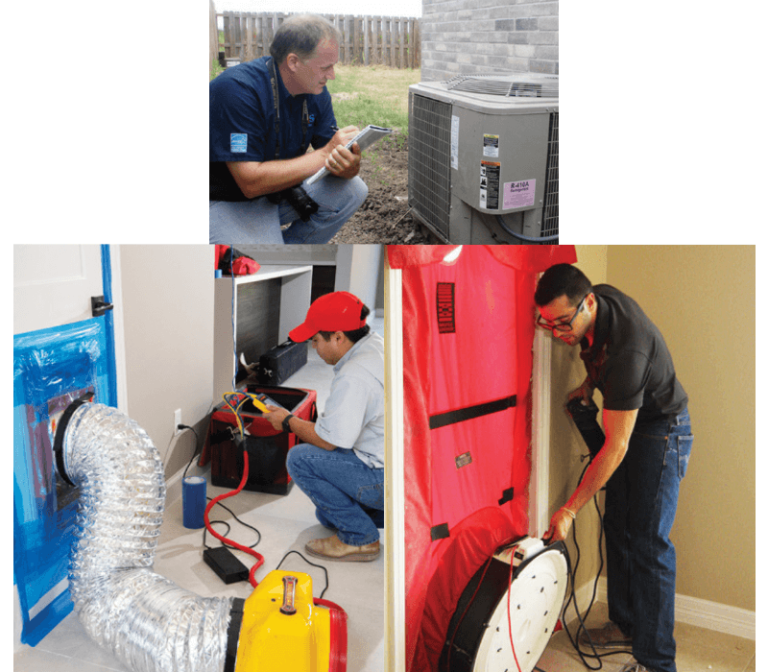
The Blower Door Test
Once the home is completed, the Rater performs a blower door test to measure the leakiness of the home’s envelope. In other words, they test how much air goes out or comes in through the roof, windows, doors, vents to the outside, and other openings. To do this, the Rater closes all openings of the home and uses a specialized fan on a doorway to first blow air in, then out. The home’s air leakage to the outside must fall within the acceptable range to qualify for the BUILT TO SAVE® certification.
NOTE: The blower door test is usually performed after the home is complete. However, a Rater can perform a roughin blower door test at the thermal inspection stage if all of the home’s openings can be covered—even if with just plywood and tape. Doing a blower door test while the home is in framing allows for an easy fix to any identified problem areas. And, if the home passes at this stage, you can rest assured it will pass at final inspection.
Step 4. PROOF OF HIGH PERFORMANCE
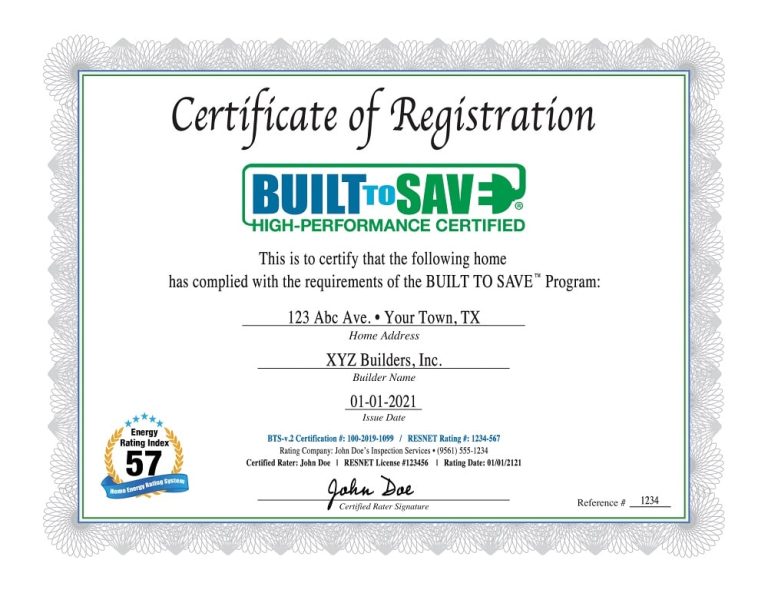
The BUILT TO SAVE® Certificate
A BUILT TO SAVE®certificate is critical proof that the home was verified as a high-performance home. The supporting documentation provided by the Rater is kept on file by BUILT TO SAVE® as proof of the home’s compliance. This archive has all of the documents submitted by the builder, the Rater, and their Provider, and includes photos taken during inspections, any issues that were found and corrected, and photos of the readings on the manometers used during final testing.
NOTE: Aside from the peace of mind the BUILT TO SAVE® certificate will give the homebuyer, it will be invaluable if they decide to sell the home. It trumps telling prospective buyers that the builder said the home is a high-performance home. National surveys show that homes certified as high performance demand a higher resale value and sell faster.
The BUILT TO SAVE® Whole-house Systems Label
Building codes require every home to have a label that lists the types and ratings of critical components of the home, such as insulation, windows and doors, and heating and cooling equipment.
NOTE: While this label is required by law, regrettably few homes have it. This mandatory label is included with the BUILT TO SAVE® certificate. Compliance with current building codes is another important benefit of the BUILT TO SAVE® program.
Become A BUILT TO SAVE® Builder
BUILT TO SAVE® program doesn’t require the builder to jump through hoops to meet extensive construction requirements or focus on non-energy saving items that would be more appropriate for building “green.” The program also provides generous incentives from Magic Valley Electric Coop (MVEC) to the builders for homes in MVEC territory that can be used to offset the cost of inspections.
GET STARTED